Most entry-level 3D printers work by extruding material, and while this has lots of cost and safety advantages, it does come with some limitations. Creating a part with extreme overhangs, arches, or angles can be a challenge. Supports make printing these geometries possible.
 How to Use Supports
Article from | Simplify3D
From cool figurines to intricate industrial models, 3D printing gives us the freedom to create all sorts of unique parts. Unfortunately, 3D printers can’t defy gravity or print over thin air. Most entry-level 3D printers work by extruding material, and while this has lots of cost and safety advantages, it does come with some limitations. Creating a part with extreme overhangs, arches, or shallow angles can be a challenge. Supports make printing these geometries possible.
 So how do you know when a print needs supports? It varies depending on the printer and the layer height of the print. In most circumstances, supports are necessary when printing overhang angles over 45 degrees. At this point, layers may begin to deform and warp without help from underneath. As the sidewalls of the print get closer to vertical (0 degrees) or overhangs get near 90 degrees, each layer is already supported by the layer below, so no additional support is needed.
Properly configured, supports will easily detach from a finished print, leaving little to no evidence they were ever there. Read on to learn how to do an overhang test and discover a simple way to automatically generate supports with Simplify3D.
Start with an Overhang Test
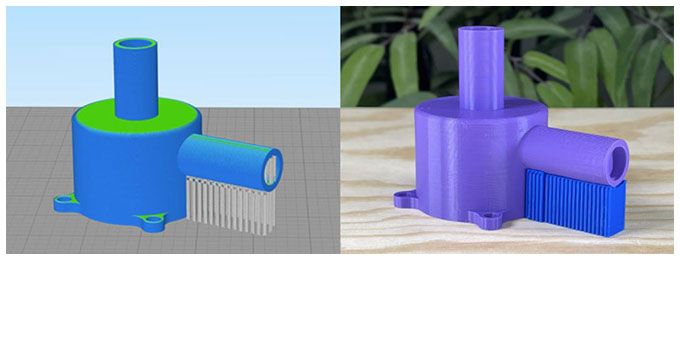
 Performing an overhang test is a good way to find out what types of angles your printer can successfully create without using supports. This overhang test print has a series of increasing angles to show at what point the printer begins to have trouble. Results from this test will help determine the Max Overhang Angle used for support generation in Simplify3D.
How to Automatically Generate Supports in Simplify3D
![]() Simplify3D is known for easily adding, removing, and customizing supports. Although there are many ways to configure and create supports within the software, the Customize Support Structures icon is the best place to begin. From the Simplify3D application sidebar, click on
Simplify3D is known for easily adding, removing, and customizing supports. Although there are many ways to configure and create supports within the software, the Customize Support Structures icon is the best place to begin. From the Simplify3D application sidebar, click on ![]() .
.
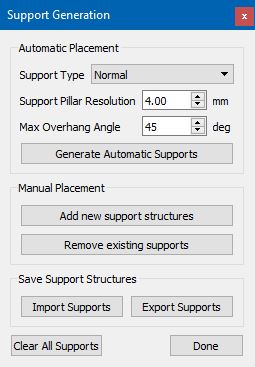
![]() Using the Customize Support Structures tool you can:
Using the Customize Support Structures tool you can:
 Select the Support Type – ‘Normal’ is the default option for most prints that require supports. Watch our video for a more advanced discussion related to Support Type options.
- Set the Support Pillar Resolution – This determines the width of support pillars. 4 mm is the default. More detailed prints will likely require a lower setting of 1 or 2 mm. Be careful, thinner supports are more fragile and may become unstable while printing.
- Set the Max Overhang Angle – Remember the result from the above overhang test? You can use it to set the Max Overhang Angle. We recommend setting the Max Overhang Angle to five degrees lower than your test value. For example, if the printer starts having trouble at 50 degrees, we recommend setting the Max Overhang Angle to 45 degrees.
- Click on Generate Automatic Supports – The software will analyze the part and create the necessary support structures. Supports will appear in dark orange.

After you add the automatic supports using the settings above, Simplify3D also gives you complete control to customize the supports. While Simplify3D does a great job of automatically placing supports, you may occasionally want to add more or less support in certain areas. You can add supports in areas that you think are extra prone to failure, or remove supports in areas that you think have too much support to begin with. Read this article to learn about modifying supports.
While supports aren’t required for every part, they have a huge impact on the success of certain prints. Understanding how to do an overhang test and generate support structures in Simplify3D will help you create high-quality prints that are limited only by your imagination — never gravity.
Now that you’ve learned a quick way to automatically place supports, grow your 3D printing skills by exploring our in-depth articles. We have beginner, intermediate, and advanced topics on everything from the basics of bed-leveling to printing with multiple extruders in Simplify3D.
About Simplify3D
Simplify3D® develops premium 3D printing software, preferred by innovators, engineers and professional users worldwide. The powerful software application streamlines the 3D printing process while providing robust customization tools that empower users to achieve high-quality results. The software supports hundreds of 3D printer brands and is available worldwide through an extensive list of industry partners.
The content & opinions in this article are the author’s and do not necessarily represent the views of ManufacturingTomorrow
Featured Product