Using Lightburn for Laser Cutting
Nowadays, it is quite easy to get your hand on a cheap laser cutter or engraver. Either you can buy a finished unit, or simply add a diode laser to your 3d printer or CNC. Once you have your laser, you are probably asking yourself how to get your images into gcode that the laser understands. One popular and compelling option to solve that problem is Lightburn. While there are free options to create gcode for lasers, at just $40, Lightburn gives you way more features that make the process not just more convenient but might also improve your results. To help you get started a bit quicker in Lightburn, we are taking a look at how to use it in this article.
Overview
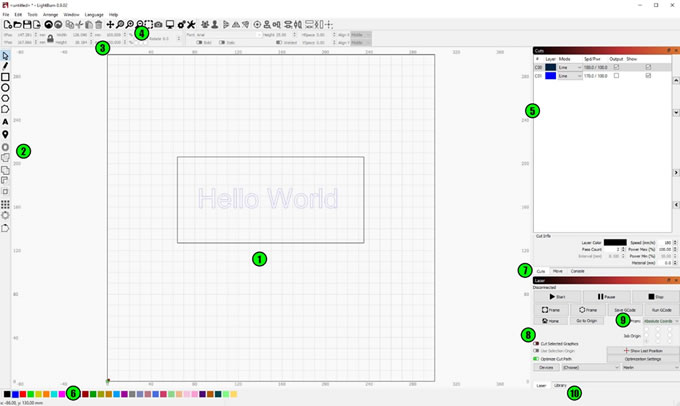
To get you started as fast as possible with Lightburn, let’s take a look around the interface. (1) In the middle, you can see a representation of the work area that you have defined for your laser. This is where you put your design and can arrange everything. (2) On the left of the screen is the toolbar for making your design right in Lightburn. You can create lines, shapes, text, and then you can combine multiple shapes into one or subtract them from each other. You also can create patterns if you need multiples of an object. (3) Above the work area, you have the properties of the object that is selected. Here you can adjust things like size, font, and more. (4) Above that, you have some more tools like opening, saving, copying, zooming on the left, and some tools to help with the alignment of the different objects on the right.
When we move to the right of the screen (5), we can see the overview of all the layers. A layer in Lightburn is a collection of shapes that all have the same engraving or cutting settings. By separating your design into multiple layers, you can engrave and cut with different settings right in the same file. To change the layer an object is on, select it first, and then choose one of the colors (6) on the bottom of the screen. Below the listed layers, you have a short overview of the laser parameters for the selected layer, and by double-clicking on the layer, you can open a more detailed window.
If you have your laser connected directly to your computer, you can control it in the other tabs (7) that are available instead of the layer overview. In the bottom right of the interface (8), we find some more controls for the laser if one is connected to the computer, but also the button to export the gcode (9) to use it with a different controller. If we switch this panel over to the Library panel (10), we can save cut settings as profiles, that we then can apply to our design and save some time the next time we use the software.
Some Tips
Of course, you are not limited to drawing your designs inside of Lightburn, but you can also import many different formats, such as SVG, DXF, Adobe Illustrator files, or even images. When you import an image, you can either engrave it as a greyscale image or convert it to lines, if it is a logo or something. The tools to do that are located in the “Tools” menu in the top bar. When engraving the image, you also have the possibility of choosing different methods. The short explanation is that greyscale tries to change the laser power to create burns of different intensity on your workpiece. For it to work correctly, you have to tune the settings for the material you are using perfectly. If you want something simpler, dither, or newsprint are good options, as they work by converting your design into dots of varying size and spacing to create different darknesses. If you want black and white, threshold gives you precisely that.
Another great tool available in the top bar is the preview. You can also reach it by pressing ALT+P on your keyboard. Inside, you get an estimate of the time it will take to complete the lasering, and you also get a graphical representation of precisely how the laser will move.
Exporting
Before you can export the gcode you created, you do have to choose the controller your laser is using. This is important as every controller uses slightly different gcode to turn the laser on and off and modulate the power. Lightburn has profiles for Marlin, Smoothieware, Grbl, CanCam, FabKit, and Gerbil in the standard version. If you have a different controller, feel free to reach out to the Lightburn staff, and they can likely help you get everything set up.
I hope that this overview helped you to get started with Lightburn. Once you get the hang of it, it is quite fast to work with Lightburn, thanks to the Library and all the great tools. So now, all that’s left to say is Happy lasering!
Comments (0)
This post does not have any comments. Be the first to leave a comment below.
Featured Product